
Use Case Diagram
Create Use Case Diagram
To create a Use Case Diagram:
Select first an element where a new Use Case Diagram to be contained as a child.
Select Model | Add Diagram | Use Case Diagram in Menu Bar or select Add Diagram | Use Case Diagram in Context Menu.
See also
UML Use Case Diagram - For more information about UML Use Case Diagram.
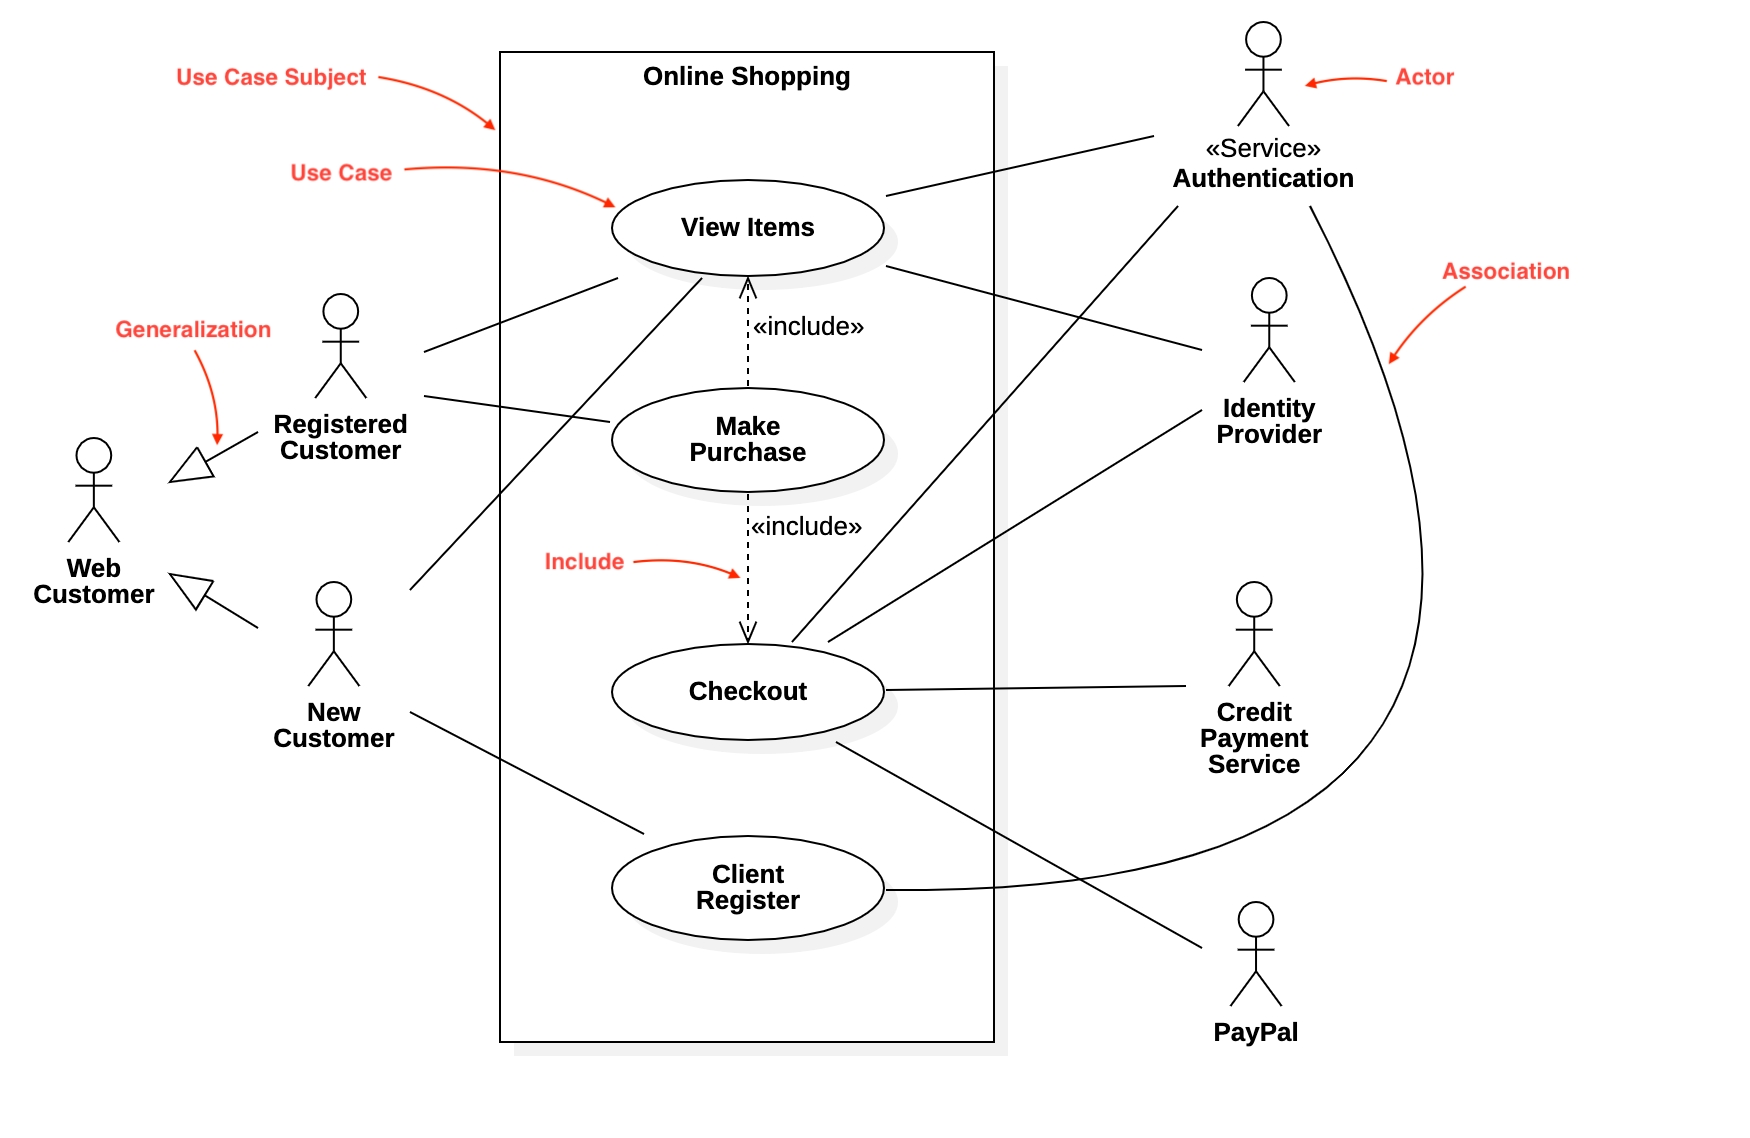
Use Case Subject
To create an Use Case Subject:
Select Use Case Subject in Toolbox.
Drag on the diagram as the size of Use Case Subject.
You can use QuickEdit for Model Element (See Model Element).
Actor
To create an Actor:
Select Actor in Toolbox.
Drag on the diagram as the size of Actor.
To create an Actor (model element only) by Menu:
Select an Element where a new Actor to be contained.
Select Model | Add | Actor in Menu Bar or Add | Actor in Context Menu.
You can use QuickEdit for Actor by double-click or press Enter on a selected Actor.
Name Expression : Edit name expression.
Syntax of Name Expression
expression ::= [ '<<' stereotype `>>` ] [ visibility ] name
stereotype ::= (identifier)
visibility ::= '+' | '#' | '-' | '~'
name ::= (identifier)
Visibility : Change visibility property.
Add Note : Add a linked note.
Add Constraint : Add a constraint.
Add Attribute (
Ctrl+Enter) : Add an attribute.Add Operation (
Ctrl+Shift+Enter) : Add an operation.Add Sub-Actor : Add a sub-actor.
Add Super-Actor : Add a super actor.
Add Associated Use Case : Add an associated use case.
To suppress Attributes, see Suppress Attributes.
To suppress Operations, see Suppress Operations.
To show or hide Operation Signatures, see Show Operation Signature.
Use Case
To create an Use Case:
Select Use Case in Toolbox.
Drag on the diagram as the size of Use Case.
To create an Use Case (model element only) by Menu:
Select an Element where a new Use Case to be contained.
Select Model | Add | Use Case in Menu Bar or Add | Use Case in Context Menu.
You can use QuickEdit for Use Case by double-click or press Enter on a selected Use Case.
Name Expression : Edit name expression.
Syntax of Name Expression
expression ::= [ '<<' stereotype `>>` ] [ visibility ] name
stereotype ::= (identifier)
visibility ::= '+' | '#' | '-' | '~'
name ::= (identifier)
Visibility : Change visibility property.
Add Note : Add a linked note.
Add Constraint : Add a constraint.
Add Extension Point (
Ctrl+Enter) : Add an extension point.Add Associated Actor : Add an associated actor.
Add Included Use Case : Add an included use case.
Add Extended Use Case : Add an extended use case.
To suppress Attributes, see Suppress Attributes.
To suppress Operations, see Suppress Operations.
To show or hide Operation Signatures, see Show Operation Signature.
Extension Point
To add an Extension Point:
Select an Use Case.
Select Model | Add | Extension Point in Menu Bar or Add | Extension Point in Context Menu.
You can use QuickEdit for Extension Point by double-click or press Enter on a selected Extension Point.
Name Expression : Edit name expression.
Syntax of Name Expression
expression ::= [ '<<' stereotype `>>` ] [ visibility ] name
stereotype ::= (identifier)
visibility ::= '+' | '#' | '-' | '~'
name ::= (identifier)
Visibility : Change visibility property.
Add (
Ctrl+Enter) : Add one more extension point in the below.Delete (
Ctrl+Delete) : Delete the extension pointMove Up (
Ctrl+Up) : Move the extension point up.Move Down (
Ctrl+Down) : Move the extension point down.
Include
To create an Include:
Select Include in Toolbox.
Drag from a Use Case and drop on another Use Case (to be included).
You can use QuickEdit for Relationship (See Relationship).
Extend
To create an Extend:
Select Extend in Toolbox.
Drag from a Use Case (to be extended) and drop on another Use Case.
You can use QuickEdit for Relationship (See Relationship).